Showing posts with label Flames of War Primer. Show all posts

Saturday, January 8, 2011

Flames of War: A Primer for the Conscript Pt 3


THE SHOOTING PHASE:

Now that you have made it through the Starting Step and the Movement Step, it's time to get down to the nitty-gritty... the Shooting Step.

In Flames of War, since things are done by platoon, the first thing to do is choose the platoon you wish to fire with. Once you have selected the firing platoon, you then select a target platoon. This platoon must be within the Range characteristic for the team or weapon being fired, as listed in the Arsenal.

The amount of dice you roll is dependant on the ROF (rate of fire) characteristic for the team/weapon. Moving usually reduces this to a value of 1, though there are exceptions to this. The number you need to roll on each die to hit the target relies on a few factors: the targets skill rating, the distance to the target, whether the target is concealed or gone-to-ground (more on that in a bit), ect. For each die that rolls above the modified number you need to hit, you score a hit. Now, the player owning the target platoon can "allocate" which teams take the hits and make the saves.

Unlike WH40k, where the player that owns the target unit can allocate hits to whatever he pleases within the unit, in Flames of War there are some restrictions on which teams can have hits allocated to.

First off, to allocate a hit to a team, it must be a Valid Target. This means it must be in view (LOS) and within range. Furthermore, if there are any Gun teams in the platoon (such as heavy machine guns, anti-tank guns, etc) they can have the most powerful hits allocated to them first. There are more rules on this, but I'll leave them for you to find on your own!

Once hits have been allocated to teams, it is time for the target platoon's player to roll their saves. Infantry are horrendously durable, and always get a good save. Vehicles are a bit more complicated, as you have compare the vehicle's armor value to the shooter's Anti Tank (AT) rating to see if the round has any effect. Gun teams are more fragile, since the team has to stay with their gun to be combat-effective. For each hit, the target rolls a single save. If the rolled die is above the unit's save (for infantry, guns, and unarmored vehicles), then the save was successful and the unit takes no damage. For vehicles, you add the armor value of the facing taking the hit to the die roll. If it is more than the AT value of the shooter's weapon, then the vehicle make's it save.

Being Concealed and Gone-to-Ground make it more difficult for the unit to hit the target in the first place, but what really adds the extra oomph is Bulletproof Cover.

Bulletproof Cover adds ANOTHER roll to be made by the attacking platoon, after the saves are rolled. The attacking platoon must roll equal to or higher than their weapon's Firepower rating to destroy a unit in Bulletproof cover. That goes back to the Digging In of units that we discussed in the previous part of this primer.

But those are mostly just the boring mechanics. You'll have to read the rules to get more into the crunchy bits. What I want to do now is introduce a bit of the rules that go beyond normal shooting that can become your best friend: the smoke rules.

Certain weapons can fire specialized smoke rounds, if it is listed in the weapon's notes in the Arsenal.

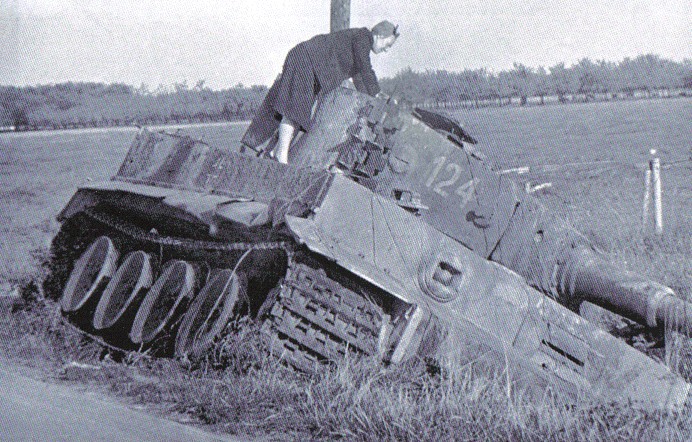
You can only fire smoke at enemy units, but you'll rarely regret it. For things you know you likely will not kill in a single round of shooting, smoking it instead reduces the amount of fire you will receive from that unit in the next turn. Smoke conceals all targets that need to draw LOS through it, making it harder for a unit to hit you. If they want to hit you without a modifier to their roll, they'll need to move, reducing their ROF. Oftentimes, my Sherman Tanks (AT 10) will do this against heavy German tanks they don't have much chance of damaging (Such as Tigers facing the platoon, AV 9). It forces the enemy to make a choice: stay in place, and miss more shots, or move, and make less shots to begin with.


So, now you know the basics of scoot, shoot, and boogie. Next part, we'll get into another major step: the Assault Step.

Thursday, January 6, 2011

Flames of War: A Primer for the Conscript Pt 2


So, now you have an idea on what goes into a list. By now, you've either supported Battlefront directly by buying their awesome miniatures, by far the greatest out there, or you went a cheaper route like ordering your tanks from this guy:
http://www.gamodls.com

Whichever way you did it, Battlefront doesn't mind too much. They know they have the best sculpts, and that keeps them happy. So, let's get into actually playing the game...

Game Setup

It takes some getting used to; playing on a Flames of War board. The scale is a bit smaller if you are used to games like Warhammer 40k, or if you are used to video games doing all the work for you. Trees are only an inch or two tall, single family homes are rarely over a few inches wide, and roads seem especially diminutive. Don't let this daunt you, however. The game actually moves pretty readily over the terrain.

For natives of 40k, you will enjoy Flames of War for at least one reason: the models actually stand up. The infantry bases are low and wide, and the vehicles are made from heavy resin. This means that inclines in the game board can be used with little danger of the models tipping over. That means actual hills! Not the goofy-looking plateau hills, but actual sloping gradients.

I like to adhere to a general rule: If the board isn't covered by at least %25 of terrain, then it's not enough. That means all the terrain for the board should at least fill up one table quarter. The terrain can be woods, rivers, tall grass, large hills, farmhouses or what-have-you, but you gotta have it (unless you are trying to simulate a fight in the open desert or something). Since the standard size game board is 6' by 4', that means at least 3' by 2' should be filled with terrain of some kind.

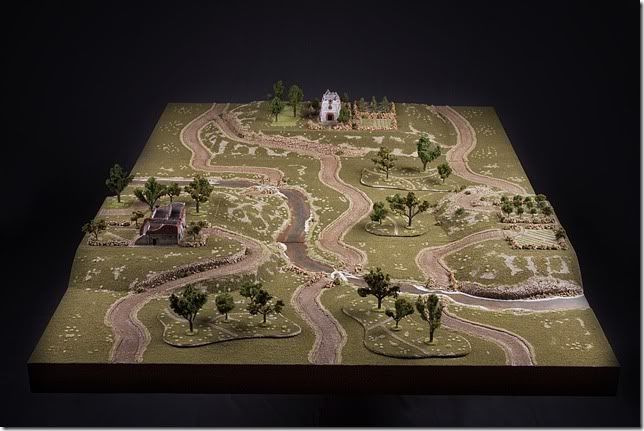
Here's what I would Dream of playing a game on:

Beautiful board by Duellist on Flames of War Forum, photography by his wife!

But for your first games, you'll more likely be playing on something like this:


It's ok, just throw a green sheet or piece of felt over it. Stack up books underneath the felt, or roll up towels underneath it, to get hills. Throw on some of the green Scotch pads (scouring pads, brillo pads, whatever you want to call them) with the corners ripped off for areas of rough terrain. Make cardboard houses that measure only a few inches wide or tall. Building really pretty boards takes a lot of time, money, and experience that will come later. For now, you just want to get to playing!

Ok, so now you have a board, and you have your army. What now?

Instead of always playing the same boring "Let's just kill each other" mission, the guys at Battlefront have already stocked you with a collage of well-written and thoroughly-playtested missions to try, as well as a table to roll on if you want to leave the mission you play up to chance!

BEFORE YOU START THE MISSION, ALWAYS READ THE MISSION'S SPECIAL RULES!!! Many times, games will get off to a bad start because the players didn't read ALL the special rules before sitting down to play the game. These rules will set the tone for the rest of the game, and they have been carefully playtested to create a balanced scenario for the players. Omitting or adding special rules is a surefire way to unbalance the scenario. That being said...

For your first game, it is advised to stick with the basics. There are the time-honored traditional missions, Firefight and Encounter, which are pretty basic as far as scenarios go. They are basically variants of the same thing. In these missions, each player gets one of the long edges of the board. For a set distance away from this edge, it is what is called their "Deployment Zone". It is the zone that you have space to put your miniatures at the start of the game.

Each player then puts a pair of objectives in his OPPONENT'S deployment zone. Objectives measure 2 inches by 2.5 inches, and usually are modeled to represent something strategically important to your force. It is your mission to take either of the objectives, by destroying all enemies near it. At the same time, the enemy is trying to capture his own objectives. This creates a very "Capture the Flag" kind of mentality, and the question is: "How can I take my objective while keeping him from his?"

After objectives are set, players take turns deploying their units, starting with their Platoons. A Platoon is one of the smallest operational units that can act independently. Generally a handful of vehicles, or a few squads (2-3 stands) of infantry, the platoon must stick together wherever they are going. This is called "Command Distance". Depending on the unit's Skill Rating (see Part 1 of the primer), this distance that the teams must remain within from each other varies from a couple inches to as much as 8 inches! This ensures that units operate as a group to achieve their goals. In Flames of War, all actions usually are performed by whole platoons, rather than by individuals. There are a few exceptions to this however, such as Independent Teams. But for now, just focus on the Platoons.

Once all platoons are placed, its time to begin. The player who gets the first turn now has a chance to act.

PLAYING THE GAME (Finally!)
In Flames of War, the game is broken down into player turns, and then further broken down into "Steps" (or phases) of a player turn. 40k players will be familiar with this, as that game system operates similarly. It is sometimes called the "I-go-you-go" style of play.

So the first player starts his turn with a Starting Step. Not much will go on here his first turn, but later in the game this is a step you don't want to skip. First, you check your victory conditions. This means you check to see if you have won the game in this step (usually by controlling an objective, meaning you wiped out all the enemies around one and you have teams nearby it). You also can Rally platoons if they are pinned down by enemy fire, or remount tanks that the crew have Bailed Out of. You can also use this step to attempt to free vehicles bogged down by the terrain. This stuff may seem unimportant at first, but remember to always do this step! Make a mental checklist:

Did I...
1) Check my Company Morale (if half or more of your platoons have been destroyed)
2) Check my victory conditions?
3) Roll for reinforcements? (if applicable)
4) Request Air Support? (if applicable)
5) Rally pinned platoons, Remount Bailed Out vehicles, and free Bogged Down vehicles?
6) Remove Smoke markers?

You also sometimes can deploy ambushes in this phase, depending on the rules of the scenario you are playing. Again, make sure you read all the scenario's special rules BEFORE playing, to make sure both you and your opponent are on equal footing.

Once all this has been done, the player can then move into the Movement Step. This is the step where you get teams from Point A to Point B.

Not all teams are created equal. You have some teams that are comprised of Infantry, who are quite rugged and can move through most difficult terrain. You also have Gun Teams, which have nearly no manueverability unless they are light enough to be Man-packed (move like infantry) or have a vehicle to tow them. There are also several classifications of vehicles: Fully Tracked, Halftracks and Jeeps, and Wheeled. A vehicle will have its type listed in its section of the Arsenal (the large summary of units and weapons at the back of an army's Intelligence Briefing). Basically, Fully Tracked rigs are more capable off-road, but have little benefit from a road. Half-tracks and Jeeps combine a little of the rugged durability of Full Tracked, but maintain a small speed increase while on roads. They aren't quite as good off-road as Fully Tracked, but it is a good compromise between Fully tracked and the last vehicle type: Wheeled. These vehicles have the least off-road capability, but they get the most speed on open roads.

Most teams have the ability to move "At the Double." If you plan to forgo shooting for a unit in the following Shooting Step, you can move your team up to twice its standard movement distance. Unfortunately, moving so fast in the open sets up that unit for nasty return fire, but we'll cover that later.

You CANNOT "Double Time" it if you plan on going through any rough terrain. Troops can't run as fast through a thick wood or rubble-strewn city block as they could through an open field.

Vehicles and Gun Teams that are not man-packed can sometimes get stuck in the mud, or on other rough terrain. This is called getting "Bogged Down" and it usually requires the crew having to get out and try to un-stick the vehicle from whatever obstacle it got lodged in/on, but you can only make that roll during your next starting step. There are two classifications of terrain that could bog you down: Difficult Going and Very Difficult Going. The more difficult the going, the easier it is to get stuck (duh). Difficult going also reduces the speed of the unit moving through it (depending on the type of unit). The more difficult the terrain, the more it slows the unit down (duh again). The exception to this is Infantry, which are not slowed by anything short of Impassable terrain such as sheer cliff-faces or rushing rivers.


If you don't feel like moving a unit, it might be a good decision to "Dig them in". Digging them in requires them to stay in place, and makes them count as moving during the Shooting Step (more on that later). Upon a successful skill test, the unit prepares itself a defensive position (by digging foxholes, stacking rubble or sandbags, etc). Once dug in, they are more resistant to enemy shooting. Be warned, however: if you decide to leave your position after you've dug the unit it, they will not be dug in even if you return to the same spot. You have to make another skill test to do so, as the foxholes do not become a permanent part of the board.

Some more advanced actions for the moving phase include disembarking from transports, entering buildings, and the like, but they are a bit outside the scope of this primer. You'll just have to read the rules to get all the info!

Most of the information presented here can be seen by downloading the "Quickplay Sheet" from the download section at www.flamesofwar.com , which has tables and references to many of the game's concepts.


Stay tuned for part 3, in which I'll go over Shooting and Assaults!

Tuesday, January 4, 2011

Flames of War: A Primer for the Conscript Pt 1


Now that I have a few practice games under my belt with the missus (she even won a few!), I feel that I can do a proper write-up for those of you who have little experience with this awesome historical game. This primer was primarily written with players of 40k in mind, but I'll try to keep my terms and examples simple for those who have little to no experience with wargaming in general.

BACKGROUND

Flames of War by Battlefront Miniatures is a historical wargame ruleset used to recreate the battles of World War Two in the 1/100 scale. In this scale, 1 foot of game table space is equal to 100 feet in real life. That means that a person that is normally 6 feet tall in real life would equate to .06 feet on the table, or roughly three quarters of an inch! This scale is also sometimes referred to as "15mm," though to be honest I'm not entirely sure why. I imagine that it may be because 15mm is the standard height of a human-sized model in this scale, but I am not certain.

Fist thing you will need is a rulebook. Like Warhammer 40k, there are two ways to get it: The Open Fire! Starter Set contains a miniature version of the rulebook that has some sections non-essential to the game ommitted, such as rules on Fortifications. The set costs anywhere from $40-$50 USD, depending on the retailer, and also contains some models to get you started (3 M4A1 Shermans and 2 StuG Gs). At this price, its quite a steal (as the tanks alone would cost in the range of $50). The rulebook can be completed with the additional rulebook supplement, called "Das Book" for somewhere in the range of $10. Alternatively, if you don't expect to need Sherman Tanks or Stug Gs, you can buy the full-sized hardcover rulebook for around $50. This book has all the rules that are not force-specific, and even nice summaries of the major battles and nations in the war. It also has tips for modeling, painting, and terrain-creation. It is invariably better than the miniature rulebook, as it is more solidly bound and less likely to break at the spine. However, it is quite large and heavy. Personally, I have one of each type of rulebook: my large one for home-reading, and my miniature one for the road.

Now that you have a rulebook, we can continue on.

Flames of War can be daunting for new players to get into. The miniatures are beautiful, and the ruleset solid, but before one can even begin to play, that person has some decisions to make. First, the setting is divided into several time periods that cover various stages of the war. Currently, only the European theater is covered, but the grapevine informs us that plans for the Pacific are currently underway. So, the player has three periods of war to choose from currently: Early War (the German Blitzkrieg), Mid-War (This covers battles in North Africa, the Eastern Front, and the Mediterranean), or Late-War (Italy, Normandy D-Day, Operation Market Garden, the Soviet's Turning Point, etc).

Once having chosen the time period, the player can then purchase a corresponding "Intelligence Briefing" that details what nations and units were involved during that time period. There are a few of what I call "Blanket" intel briefing books; books that cover a time period in general. For Early War, the only intel briefing out currently is called Blitzkrieg. I am not familiar with this book, as it is relatively new, and I have no suitable models for this time period. From what I understand, it has intelligence on German, French, and British forces that fought during the opening stages of the war. For Mid-War, there are two main books: North Africa covers the conflict for that continent, as well as other battles in the Mediterranean at that time (such as Sicily). Eastern Front details the struggle between the Axis powers and the USSR during the time period of 1942-1943. For Late-War, the blanket book is Fortress Europe, which details a generalized view of the closing stages of the war in Europe. There are MANY Late-War supplements to add onto the "Blanket" intel briefing, many of which cover individual conflicts or operations (such as D-Day, Operation Market Garden, etc.) that can be used to add onto the basis provided by the Intel Briefing.

Another great thing about Flames of War, is that new versions of the Intelligence Briefings do not invalidate the old. For example, the older versions of Mid-War Intel Briefings were called "Afrika" and "Ostfront." These books have mostly the same content as the new ones, but the layout of the unit organizations was a little bit more confusing for the new player. The new books are slimmer and trimmer, with better layout of unit diagrams so that the new player can get to playing quicker with less confusion.

In addition to this, there are several free-to-download intelligence briefings available from the Flames of War website. These usually cover irregular units, but the cost can't be beat!

Each Intelligence Briefing has in it details on the time period or battles for the theater it is based on, as well as Force Lists detailing what kind of Company you can create based on historical forces that fought there.

With the appropriate Intel Briefing in hand, now you know what you need to create a playable army of your own. Select a company from the briefing (or battalion for Soviets) and start building it! I'll show you how:

MAKING YOUR FORCE

Tank Companies (forces comprised primarily of tanks) are a bit easier to build, so we'll start there. (Though not easier to play... I'll save the tactics for a later post however.) I will use the Intelligence Briefing "Tigers in Tunisia", available for download from the Flames of War website, as an example.


This is part of a Intelligence Briefing chart on a Schwere Panzerkompanie. In this chart, it shows you the minimum requirement to make a Schwere Panzerkompanie, the HQ section and two Combat Platoons comprised of Schwere Panzers. The grayed-out, or desaturated, boxes represent available options for expansion.

You might see this a lot in the description for the Company: "You may select one support platoon from each box shown "Infantry, Armor, etc.". This means that for all the platoons shown in a single box, you may only choose one to add to the force. For example, under "Infantry" in the Divisional Support section, you may see options for a Panzergrenadier Platoon, a Afrika Schützen Platoon, a Grenadier Platoon, or a Fallschirmjäger Platoon. This does not mean you can take one of each, but rather you may choose one platoon to take from the group and you must omit the rest.

The chart also shows you what page to look at to see the points cost and description for a particular platoon or unit. First off, let's look at what makes up a HQ. We'll flip over to the next page and read the description.


Looking at the description for the HQ, you may notice a pattern. Optional units are again desaturated or grayed-out, and you have one or several "Must-Have" units in solid black. In the example above, the only tank you are required to take is a single Tiger 1E tank. You have the option of adding a 2iC (second in command) tank or a recovery vehicle, but neither one is absolutely necessary to field the unit.

So for the HQ unit, you simply need to purchase at least the one Tiger 1E tank, build it and paint it. Easy enough!


Infantry units are the ones that require the most detail. In the diagram of the unit, it tells you what each "team" (a single stand of infantry) will have on it. This is done for a reason: each team must have WYSIWYG (what-you-see-is-what-you-get) representation of the historically-accurate armament they would have carried. For example, in an American Rifle platoon, a squad has 3 stands of 4 troopers each. One trooper on one stand would be equipped with a Browning Automatic Rifle to provide fire support. On another stand, the NCO would be equipped with a Thompson M4A1 automatic. On the remaining stand, and for the rest of the troopers on the first two stands, they would be equipped with M1 Garand rifles.

Let's get back to our example:


In contrast to the American Rifle Platoon I described, the Grenadier Platoon in our briefing have only 2 stands of infantry with 5 members on each stand per squad. Looking closely at the pictures, you can see what armament should go on each stand: at least one member from each squad of two stands should have a MG. This is because the stands are classified as "Rifle/MG" teams, which tells us in-game that there is usually at least 1 MG per squad. For "Rifle" teams, there are none, for "MG" teams there are at least two or more!

You'll also notice that the Command Team has only 3 members. The Command Team is usually mounted on a smaller base, 1 1/2" x 1" as opposed to the 2" x 1 1/2" base used by the normal infantry teams.

Building infantry units usually requires a bit of historical knowledge beforehand, so you can appropriately identify the weapons depicted in the silhouetted images in the diagrams. It is best to do some research if you don't already know a fair bit about the historical weaponry used by the force of your choice.

Sometimes, you will have the option to choose a different division or organization to model the force after. Usually the reason for doing so will be a different degree of competency, reflected by the unit's "Rating". This is their "Motivation" (how inspired they are to fight), followed by their "Skill" (how experienced they are in battle). The motivational ratings include "Reluctant" (Fairly unwilling to be participating, and will likely break at earliest opportunity), "Confident" (mostly willing to put up a fight, but might break under strenuous circumstances), and "Fearless" (pretty self explanatory, unwilling to break under anything but the direst of situations). Skill ratings include "Conscript" (thrown into battle with little or no training), "Trained" (given extensive training, but unlikely to have seen battle yet), and "Veteran" (seen multiple battlefields and lived). These ratings greatly affect the efficiency of your force.

The Intelligence Briefing can provide more information on using alternate motivation and skill ratings for your force, if alternate ratings are available.

ON POINTS VALUES

In Flames of War, the most commonly-seen points limit I have seen is 1500 points. It is generally accepted to go under this limit, but never over. Even if you are a single point over, you must find something to alter or cut out to bring your points total under the limit.

However, for your first few games or when starting a new force, a far more achievable points limit is 600 points. When playing a game of this size, you can ignore the requirement to take 2 Combat Platoons from your chosen company. You are only required to take at least 1 HQ, and 1 Combat Platoon. These games also go quickly, being played in usually an hour or less. Usually a 600 point battle will only consist of a couple platoons per side maximum. This makes 600 point battles the easiest to prepare a force for.

Be sure to use the points values from your chosen army list, because points values may vary from time-period to time-period or even list-to-list. For example, tanks in Mid-War are typically more expensive than tanks in Late-War, because there were fewer ways to deal with armor in the Mid-War era.

Once you have chosen a list in the points value range agreed-upon by your opponent, you can then get on to playing the game! If you bought the Open Fire! boxed set, I suggest you and your opponent (if he/she is also new to the game) run through the scenarios provided in the introduction booklet, to get a feel for some of the game concepts. The forces provided in the boxed set are fairly equal in points.

Playing the game will be covered in Part 2 of this article, so stay tuned!

DISCLAIMER

This web site is completely unofficial and in no way endorsed by Games Workshop Limited or Battlefront Miniatures.

Adeptus Astartes, Blood Angels, Bloodquest, Cadian, Catachan, the Chaos devices, Cityfight, the Chaos logo, Citadel, Citadel Device, Codex, Daemonhunters, Dark Angels, Dark Eldar, 'Eavy Metal, Eldar, Eldar symbol devices, Eye of Terror, Fire Warrior, Forge World, Games Workshop, Games Workshop logo, Genestealer, Golden Demon,

Adeptus Astartes, Blood Angels, Bloodquest, Cadian, Catachan, the Chaos devices, Cityfight, the Chaos logo, Citadel, Citadel Device, Codex, Daemonhunters, Dark Angels, Dark Eldar, 'Eavy Metal, Eldar, Eldar symbol devices, Eye of Terror, Fire Warrior, Forge World, Games Workshop, Games Workshop logo, Genestealer, Golden Demon, Gorkamorka, Great Unclean One, Inquisitor, the Inquisitor logo, the Inquisitor device, Inquisitor:Conspiracies, Keeper of Secrets, Khorne, Kroot, Lord of Change, Necron, Nurgle, Ork, Ork skull devices, Sisters of Battle, Slaanesh, Space Hulk, Space Marine, Space Marine chapters, Space Marine chapter logos, Tau, the Tau caste designations, Tyranid, Tyrannid, Tzeentch, Ultramarines, Warhammer, Warhammer 40k Device, White Dwarf, the White Dwarf logo, and all associated marks, names, races, race insignia, characters, vehicles, locations, units, illustrations and images from the Warhammer 40,000 universe are either ®, TM and/or © Copyright Games Workshop Ltd 2000-2016, variably registered in the UK and other countries around the world. Used without permission. No challenge to their status intended. All Rights Reserved to their respective owners.

Games Workshop, the Games Workshop logo, Epic, Inquisitor, the Inquisitor logo, Inquisitor:Conspiracies, Battlefleet Gothic, the Battlefleet Gothic logo, Necromunda, the Necromunda Plate logo, the Necromuinda Stencil logo, Mordheim, the Mordheim logo, City of the Damned, Blood Bowl, the Blood Bowl logo, the Blood Bowl Spike device, Fanatic, the Fanatic logo, the Fanatic II logo, Warmaster and all associated marks, names, races, race insignia, characters, vehicles, locations, units, illustrations and images from the Blood Bowl game, Warhammer 40,000 universe and the Warhammer World are either ®, TM and/or © Copyright Games Workshop Ltd 2000-2016, variably registered in the UK and other countries around the world. Used without permission. No challenge to their status intended. All Rights Reserved to their respective owners.

Flames of war are either (R), TM and/or (C) Battlefront Miniatures.


Unless mentioned otherwise, the contents of this site are (C) Matt Darnell, 2008-2017