Showing posts with label Conversion. Show all posts

Monday, August 10, 2009

Ghillie Snipers


I found this post on Dakka Dakka about using gauze bandages to emulate the effect that ghillie suits create on snipers. -Read it here- I immediately got lightbulbs flashing over my head, especially after reading how cheap the basic unit of Ratling snipers are in the IG codex. These are my "Counts-as" Ratling snipers, after a quick ten minutes of converting. If you want a pair for yourself, grab a couple of standard guardsman and try this:

Method: cutting squares of gauze from a bandage square, wet it with watered-down PVA glue and drape it over the trooper, using a brush to make it conform to the body. Leave the face uncovered, and make sure that it doesn't appear that the guy is going to trip on his ghillie. Add several layers of this method, but only enough to break up the conventional human outline. Marshmallow/spaghetti men are a no-go.

For the lasgun: I simply cut off the standard las-barrel, drilled a small hole in the main lasgun body, and cut off the antennae from a vox-pack and inserted the rod in the hole (insert joke here) with the fat part at the end for the barrel.

Since my troopers don't operate in vegetation, the painting was not hard at all. I just base-coated with my standard uniform color, painted the boots, painted the flesh, and then heavily globbed on some black wash for some of the easiest to convert and easiest to paint models I have put together in a while. The ghillie suit is not always meant to simulate foliage, its primary goal is to break up the normal shape of a man that might be discerned by sharp eyes even if the sniper is well-camouflaged. I think this method simulates that pretty darn well, don't you?
Until next time,
--FP135

Sunday, August 9, 2009

ANOTHER Griffon update...


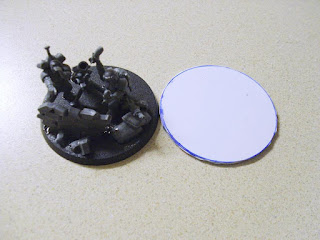
Ported the mortar tube, retooled the bipod, and added a crewman (the assistant gunner that relays firing orders from the fire-control computer).

I think I am going to call it quits on this project until after the next competition.

Griffon Project Update


I was looking at some pictures on the internet of my intended result for the Griffon project: a M106A4 Mortar Carriage. I decided that the current design of converted Griffon I had did not fit well enough, so I found my rhino top-hatch doors and got to work.

I had to cut the doors apart, as I had initially glued them together. I also reduced the length of the barrel. Furthermore, I fashioned a simple bipod from cut sprue pieces, and mounted the weapon to the floor with a piece of poster-tack. I feel a lot better about this version of the Griffon I have converted, as it more accurately conveys a mechanized heavy mortar to me. I get tired of seeing the same old conversions on chimera hulls, so I thought I would try this one differently. Well, there you go. Comments, questions?

Until next time,
--FP135

Wednesday, July 15, 2009

Making the Most of your IG Heavy Weapon Teams


A large limiting factor that most people have with their leftover heavy weapons from the squad is that there are not enough bodies to put on the guns. Well, I have come up with a temporary solution that allows you to put heavy weapons teams in your squads without having to buy a whole bunch more legs and torsos for the job!

Step 1: Make a base. I cut mine from a garage sale sign, purchased at walmart for 2 dollars. You will need to double them up if you do this, to get the right rigidity. Even when doubling them up, there is enough material to make at least 6 bases. Plenty for the leftover weapons on the sprue.

Step 2: Cut a lot of sprue. Cutting up the sprue into small chunks resemble small bricks. These bricks will be strategically placed later to create a nice rubble effect, as well as contain the bases of the minis you use as the gunners.

Step 3: Construct the weapon. If you have the tripod, use it. If not, it is possible to build a brick wall from the rubble and mount the weapon on it. The trick is to leave two spaces that can accommodate a regular miniature base. I find it easiest to do if you construct the gun the farthest forward you can fit it on the base.

Step 4: Use your infantry as the gunners! They also work great for representing wounds. When the gun team takes a wound, simply remove one of the infantry models. When you finally get the extra bits, you can glue them into the spaces you left, completing the model. In the meantime, though, add some LAZE to your gunlines!

As stated before, this is a temporary fix. What other ways have you found to utilize all the weapons that come on the sprue?

Thursday, July 9, 2009

Stormtrooper 1 is done!


...And his buddies are waiting. Just thought I would share what I have done on him so far. This is pretty much the scheme, but I may go back and do heavier highlights later. For now I just want them table-ready. How do you like how that backpack came out? I am pretty pleased with it. It was simple to make and looks decent while adding some character to an otherwise-static pose.

Any day now my Battleforce should get here, along with the 60 heads I ordered from Pig Iron Productions! Next stop: Conversion-town!

Wednesday, July 8, 2009

Collaborative Contribution: Greenstuff Bedrolls


Cadians can be boring, but there are so many! How can you possibly do anything to them that will not take forever, but still improve their diversity?

Here is a quick tutorial on making easy and fast greenstuff bedrolls to add to your trooper's kit, and it doesn't take long at all:

1. Take a small amount of greenstuff and make a long rectangle of the desired width you want the bedroll to be. The length may take a little bit of tinkering to get right, as too long will result in a bedroll that is too fat. (No I don't mean eats-at-McDonalds-everyday fat, I mean that its circumference will be too large.)

2. Careful to keep from fingerprinting it, stick it to the back of the model.

3. Using a sculpting tool or a dull knife, use a rolling motion over the perimeter of the roll to make two indents in the roll, indicating where ropes are holding it in place.

4. If you have a really steady hand, you can use a sharp utility knife to cut minuscule alternating diagonal slashes in the bottom of these indents to give the appearance of a rope's strands. Alternatively, if you are good at making chains you could place a chain in the indents to attach the bedroll.

That's it, pretty simple huh? Now those boring Cadian troops can have a bed to roll out! They don't do much anyway, may as well catch a wink. You can really pump these out once you get the hang of them, and they add a bit of flavor to any ground-pounder army.

Pop on over to FTW for the complete compilation of collaborative contributions by community crafters! (Wow that was a lot of alliteration!)

New look, for both the blog and the trooper!


Continuing on with my conversion project, I tried to do a little more greenstuff work. Now I know why Ron at FTW loves doing greenstuff work so much! It really is a challenge. I am definitely beginning to get more comfortable delving into sculpting simple stuff. Here is as far as I got for tonight (it being 1 in the morning): I used some guitar string as tubing for a hose leading to the back, cut the gun free and bent the arm (with a pair of pliers, thus needing to repair the arm where the teeth bit into), and laid the foundation for a backpack sculpt later on. I had fun doing this and can't wait to get some sleep so I can get back on it tomorrow!

As a side note, I hope you like the new blog layout. I needed a more relaxing theme!

Tuesday, July 7, 2009

Pre-IG Project continued: Storm Troopers


Well, the cat is out of the bag. Here are my latest conversion projects: A squad of anti-MEQ Storm Troopers converted from yet more Ral Partha miniatures (4 Neo-Soviet Vanguard and a Mutant Handler from the Vor line, no longer a mainstream production game). These are my first attempt at converting metal models, so we'll see how it goes. I don't have clamps, so I am trying to attach the plasmaguns to the metal models by first gluing them with plastic cement, which theoretically will make the plastic plasmagun conform better and stick a tiny bit. After it is dry, I am going to go back and superglue it on to make sure it stays put. If that doesn't work I may have to get creative, like using greenstuff or an epoxy glue.

Hopefully I will have these ready to paint by tomorrow morning. Stay tuned!

DISCLAIMER

This web site is completely unofficial and in no way endorsed by Games Workshop Limited or Battlefront Miniatures.

Adeptus Astartes, Blood Angels, Bloodquest, Cadian, Catachan, the Chaos devices, Cityfight, the Chaos logo, Citadel, Citadel Device, Codex, Daemonhunters, Dark Angels, Dark Eldar, 'Eavy Metal, Eldar, Eldar symbol devices, Eye of Terror, Fire Warrior, Forge World, Games Workshop, Games Workshop logo, Genestealer, Golden Demon,

Adeptus Astartes, Blood Angels, Bloodquest, Cadian, Catachan, the Chaos devices, Cityfight, the Chaos logo, Citadel, Citadel Device, Codex, Daemonhunters, Dark Angels, Dark Eldar, 'Eavy Metal, Eldar, Eldar symbol devices, Eye of Terror, Fire Warrior, Forge World, Games Workshop, Games Workshop logo, Genestealer, Golden Demon, Gorkamorka, Great Unclean One, Inquisitor, the Inquisitor logo, the Inquisitor device, Inquisitor:Conspiracies, Keeper of Secrets, Khorne, Kroot, Lord of Change, Necron, Nurgle, Ork, Ork skull devices, Sisters of Battle, Slaanesh, Space Hulk, Space Marine, Space Marine chapters, Space Marine chapter logos, Tau, the Tau caste designations, Tyranid, Tyrannid, Tzeentch, Ultramarines, Warhammer, Warhammer 40k Device, White Dwarf, the White Dwarf logo, and all associated marks, names, races, race insignia, characters, vehicles, locations, units, illustrations and images from the Warhammer 40,000 universe are either ®, TM and/or © Copyright Games Workshop Ltd 2000-2016, variably registered in the UK and other countries around the world. Used without permission. No challenge to their status intended. All Rights Reserved to their respective owners.

Games Workshop, the Games Workshop logo, Epic, Inquisitor, the Inquisitor logo, Inquisitor:Conspiracies, Battlefleet Gothic, the Battlefleet Gothic logo, Necromunda, the Necromunda Plate logo, the Necromuinda Stencil logo, Mordheim, the Mordheim logo, City of the Damned, Blood Bowl, the Blood Bowl logo, the Blood Bowl Spike device, Fanatic, the Fanatic logo, the Fanatic II logo, Warmaster and all associated marks, names, races, race insignia, characters, vehicles, locations, units, illustrations and images from the Blood Bowl game, Warhammer 40,000 universe and the Warhammer World are either ®, TM and/or © Copyright Games Workshop Ltd 2000-2016, variably registered in the UK and other countries around the world. Used without permission. No challenge to their status intended. All Rights Reserved to their respective owners.

Flames of war are either (R), TM and/or (C) Battlefront Miniatures.


Unless mentioned otherwise, the contents of this site are (C) Matt Darnell, 2008-2017