Tuesday, March 31, 2009
Continuing the Foamcore Project- Extra Credit
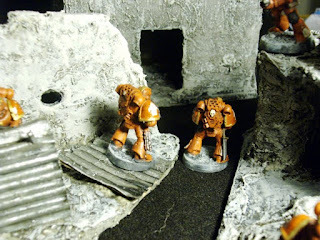
When you get up the next morning, your building will look like the first picture up there. For some people, that is good enough. I, however, am not one of those people, and I suspect you are not either. So, it's time for some extra homework to get extra kudos!
If you have the time and the paint, then it's time to go to work. First off, I like to coat the building with a black wash made from watered down black acrylic. Any black paint will do, and in fact, the cheaper the better. I got a pot for 50 cents from Wal-Mart. Add a big ol' glob and a dash of water to thin it out, then paint the wash over the entire piece. This watered-down solution should run into all the cracks and bring out the depth of the texture.
Next, using your large brush, drybrush a dark gray over the entire piece. Pay special attention to the edges, because concrete is lighter on the inside when cracked open. Drybrush, for those new to the hobby, is a painting technique where you get paint on your brush, then dab some of it off onto something you don't mind getting paint on, before lightly brushing over the area you wish to paint. This causes only the raised texture to catch the pigment on your brush.
After this coat dries, add some white paint to your grey, and mix it up good. Using the same drybrushing technique, apply this lighter grey over the entire piece again, really emphasizing the edges. You can add a third coat, this one pure white, but I usually think that's a little over the top.
After the second coat, the piece is table-top ready. You can add a clearcoat if you wish, but I find that the glue we used in the mixture is usually sufficient by itself. Later, I will share some of my tips to make the terrain piece worthy of sharing the table with your best painted miniatures!
Foamcore Ruins, Part 3
Finally, the last part. Spreading the stuff on is not really an art, but it does help to have a technique.
First off, make sure you are doing this on a surface that can get a bit of gunk on it and it won't matter. I use a piece of unused foamboard that I also use for painting miniatures on. You don't want this stuff getting on your nice kitchen table (I speak from experience)....
Using your large brush, spread on the first coat evenly. It is perfectly okay to put a thick coat on, because with all the glue in the mixture it will be nice and solid when it dries. Due to the black paint you put in, your mixture should be a dark gray color. This makes it easy to see the spots you missed, and serves as a good base-coat. All the white powder and glue lightened up the black, so if you want a totally black basecoat you will have to paint it when it dries. I will cover painting it in the next part.
When you are applying the coat of stuff, pay special attention to the corners and the edges. The plaster helps define the edges and make them look more like ruined rubble. Adding successive layers can help build up more rubble in the corners.
In order for it to harden properly, you should let it dry for at least 10 hours. Or overnight, whichever you prefer. I tend to make this my last project for the day, because I hate to wait for anything. Make sure it is out of reach of kids and pets. Also, the temperature and humidity has an effect on the drying time. I am basing my drying times on 68 F, really dry conditions. Your results may vary.
Next up, Painting the Foamcore Ruins!
Foamcore Ruins, Part 2
The Next Step:
Now that our basic design is complete and taped together, now its time to mix up a little compound to give the model texture and give it strength. This is not an exact science, and I do not use precise amounts of the ingredients. It helps lend individuality to each piece. If you want pieces to conform with each other, then it is best to make multiple pieces at the same time.
Start with your patching plaster powder (hereafter referred to as 'p3'), and add a little into a mixing container you don't plan on eating out of any time soon. On top of this, I sneak a pinch of potting soil out of my wife's plants. This is to add texture to the wall that the plaster alone does not achieve. The potting soil is optional, however, as it does not much else.
To this dry mixture, I add some black paint, and a huge gob of PVA glue. The glue and the paint are the only liquids added to the dry mixture, and this combination makes for a solid product once dry. If you find the consistency too dry and crumbly, then just add more paint or glue until you get a consistency of a thick paste. Think thin mayonnaise, but without the side-effects that incurs such as vomiting and nausea. If the potting soil makes it more like crunchy peanut-butter, then you are on the right track, just add more glue and paint.
Alternatively, if you find that your mixture is runny like thick milk, add some more plaster and soil to dry it up a bit. You want a creamy paste as your end result, such as pictured above.
In the Third Step, we'll cover the application of this gooey concoction.
Foamcore Ruins, Part 1
Alas, I finally got around to making a tutorial on my foamcore ruins. This is a fairly well-known method, but I have got enough questions about my previous pieces that I thought I would share my 'secrets' with you all.
First off, the supplies you will need:
-PVA Glue (Elmers, or white glue, for those who don't know what PVA is)
-Cheap black paint
-Powdered Patching Plaster (The kind used for repairing drywall and the like)
-A larger paint brush
-Foamcore (It is a kind of posterboard made from a piece of thin styrofoam sandwiched between 2 layers of paper, found in most department stores)
-Masking tape (That off-yellow tape people use to cover up stuff they don't want to get paint on)
-Sharp hobby knife or utility blade to cut the foam core
-A suitable place that you can cut stuff on or get real messy and not get in trouble with the wife (or for some of you, the mom! Hey, I don't judge.)
Step 1: Creating your basic shape.
When I am making ruins, I tend to make a small single corner. That way, if I want larger buildings, all I need to do is line up four corners to look like they were a single building at one point. With this in mind, I set about making the corner. One long wall usually serves as the focal point of my structure. I then match up one smaller wall at the corner. Adding in a small second floor, cut to match the degradation of the building, helps add a third dimension of playability to the ruin. A doorway ensures that it is not an impregnable fortress. A simple base to keep it all together, and we have all the basic elements of a structure.
After you have your basic shapes, put them all together with the masking tape. Make sure every edge is masked, as seen in the pictures. This will help make the piece more durable, so pieces aren't coming off of it.
The next step is preparing the mix....
Monday, March 30, 2009
A Pious Chaplain
Death Company
Mephiston
I am beginning to sense a change...
Upon reading the codex, I found that Blood Angels had a unit named Death Company Marines. With rending CC attacks, Feel No Pain, Furious Charge, they seemed like a decent way to plug up the gap my force was having in assaults. But I didn't have any DC models, or a chaplain to reign them in! Well, now was as good a time as any to get some.
I went on ebay, and discovered that DC are expensive! Thus, I purchased a lot of 2 tactical squads and a command squad that had been owned by some kid. I then bought some bits from a supplier on ebay. Ok, not just some, A LOT. I used chainsword and bolt pistol arms, along with the torsos, heads, and legs of the tactical squad marines I got, to make some DC.
I got a Mephiston and a Chaplain, so I waited eagerly for them to arrive.
It was official, I was going Blood Angel. Obviously my force would have to be a successor chapter if I didn't want to paint all my units again. But I now had direction, which is what I was missing. I was going to be a MEQ!
The Bitter Sting of Defeat
A brief summary of the games:
Game 1 vs. Orks-
The objective of this game was to control as many of the 4 deployment zones as possible while denying the enemy control of the same. The 4x4 board was divided into 4 quadrants, with 6 inch spaces between deployment zones, which were located in each corner. The Ork player had over 105 models total! Boys, some Nobs, Deffcoptas, Meganobs, etc. Mostly boys though, at over 75 models! I tried to hold off the horde as long as possible, but my dice rolls were abysmal, and their assault phase totally overwhelmed my model-short force. I was destroyed by turn 4. Some notable moments of the battle: Terminators arrived on turn 2 and attacked the nobs in power armor like stuff (sorry I don't know much about Orks...), disrupting an assault before it began. Then they promptly died as combined fire from Deffcoptas with TL Rokkits, a Truk rocket, and a Powerclaw assault ripped them to shreds. The Rhino lasted longer than all the rest of the models, despite its storm bolter being blasted off. The Chapter Master turned tail and ran right off board, very unbecoming a character of his position!
Battlepoints: 3 / 23
Game 2 vs. Chaos Demons (BLOOD FOR THE BLOOD GOD!)-
The objective of this game was to have more scoring units in your opponents deployment zone than he had in yours. The deployment zones were 15" from each table edge. I had begun the game with my first tactical squad mounted in the rhino, and did not hold back any reserves. All of his forces had to be deep-struck in on the first turn, so I didn't really know how I was to deploy, but I lumped most of my forces to my left side for a strong push that way. I had to go second, so I didn't even get a chance to rush my rhino across the small board before his Soul Grinder immobilized it! So much for my rush strategy. I attempted once to get it working, but to no avail, so I had to wait a turn to disembark. The Devastators really did good this battle, helping to take out some troops of my opponents. My Dreadnought did admirably as well, destroying his big Soul Grinder with his multi-melta, but a more assault-capable demon ripped into it and tore it to pieces. My terminators died in the second turn, much to my disappointment. My Tactical Squad that was linked with my Chapter Master also died a horribly violent death, ripped to shreds by very assault-potent pack of Bloodletters. My devastators actually held their own in assault, holding back some dog-named demons of some sort. They unfortunately lost the initiative roll off, despite a tie, due to some special ability (mark of khorne) that allowed the deamons (with their special character) to automatically win tying die rolls for assault result by 1. My Dev's were close to the board edge, so when they fell back they went off board and were eliminated. In the last turn, my immobilized rhino desperately tried to kill the few remaining Bloodletters in my deployment zone while my surviving Tactical squad attempted to dodge through two of the larger demons to get across the board to force a draw, but the demons caught the squad and crushed it between the weight of their onslaught, and the game ended due to me not having any scoring units and the game time ended. I did better than the first game, inflicting more casualties and holding my own better, but those chaos demons are vicious with every unit deepstriking into my formations.
Battlepoints: 6 / 23
Game 3: Forfeit
Had to leave early because of perceived complications with my wife's pregnancy (don't worry, everything turned out to be ok).
Battlepoints: 0 / 23
TOTAL-
9 / 69 Battlepoints
9 / 46 out of games played = 19.5 percent points, equivalent to a F grade. I obviously need some work on my tactics. I probably would have done better if I had been able to stay for the last game, but sadly I could not. Oh well, lessons learned!
A force to be reckoned with...
With the completion of the Devastator squad, the day of the competition was upon me. I was able to pick up another AoBR Tactical squad from ebay, but unfortunately I was unable to paint them more than a precursory undercoat before the event. Luckily, the competition was battle-points only, so I was not penalized. It was February 21st, 2009, and I was ready!
This was my force list, forced to be point heavy by my lack of models:
HQ
Chapter Master: 190 PV
Articifer Armor, Relic Blade, Boltgun, Hellfire rounds, Digital Weapons
TROOPS
Tactical Squad 1: 210 PV
10 SM, Melta, Missile Launcher, Plasma Pistol, Chainsword, Meltabombs, Tele Homer
Tactical Squad 2: 205 PV
10 SM, Flamer, Missile Launcher, Plasma Pistol, Chainsword, Meltabombs, Tele Homer
Tactical Squad 3: 190 PV
10 SM, Flamer, Missile Launcher, Chainsword, Meltabombs, Tele Homer
ELITE
Std. Terminator Squad: 200 PV
Venerable Dreadnought: 180 PV
Extra Armor
HEAVY SUPPORT
Devestator Squad: 255 PV
2 Lascannon, 2 Plasma Cannon, Powerfist, Plasma Pistol, Meltabombs
TRANSPORT
Rhino: 70 PV
Extra Armor, Storm Bolter, Hunter/Killer Missile
Devestator Squad!
Even with my force commander done, something was missing. I was worried that I would be facing a lot of Mech forces. I had never played a real competitive game before; I had only run my force against the AoBR orks (with my wife playing them) so I would have a better grasp of the core ruleset.
I went to my local GW shop, with the intention of buying some more vehicles. I had hoped to pick up a Predator. Instead, all he had was infantry models. So, I settled for a Devestator Squad. The more I read about them in my codex, the more I realized what a wise Heavy Support choice they were. I went to painting them, very enthusiastically. I started defining my painting style, emphasising the grittyness of street fighters. I also tried a new technique: painting the eyes! I thought green lenses would contrast the red armor well.
The Last of the AoBR Marines
I spent a lot of time finishing up the AoBR Tactical squad. I sped through them, as the competition I was preparing for was only a week away. I also wanted to spend a lot of time on the Company Commander, giving a go at free-handing the detail. It came out ok, I was told. You can judge for yourself!
Some more AoBR
Getting Started on AoBR
I finally got the box when I got home from work one night, and promptly spent until 2 that morning assembling all the contents of the box. I assembled the orks too, probably unwise because now I am having a harder time getting rid of them, but I was excited. What can I say?
I knew that I would have to pad my units with points in order to meet the point requirement for an up-and-coming competition I signed up for. Thus, I did my very first conversion! I was so proud.
I then turned my attention to the Dreadnought. I wanted it to be able to pass as a Venerable Dreadnought if I needed it to, so I went about adding details to make it more venerated. Tow hooks on the roof, an abundance of purity seals, and a searchlamp from the Rhino sprue were all added to this end. I did manage to remember to drill out the multi-melta barrels.
Sunday, March 29, 2009
A Lonley Rhino
My next purchase, while waiting for the AoBR set, was a single Rhino. I know, I know, you never buy a single Rhino, and you would save money by buying a Razorback, Whirlwind, or Predator and magnetizing the pieces so you could make both. In my defense, I was new to the hobby and being a Dad means that my expendable funds are nil.
Anyway, I also got some paints. Hello, GW Foundation paints! I painted the Rhino Mechrite Red, the doors the same cheapo gold color as the trim from the tac squads, and gave it a wash. It looked passable on the table.
Staged Shots
After I got those done, I started in on some decals and washes, and I started figuring out that not all paints were created equal. My crappy "Applebarrel" paints were sucking immensely, so I started picking up some GW paints, just in time for the new AoBR set to arrive! I knew that I wanted red with gold highlights, but I was going for a dirtier, grungier look. I wanted the models to look like wartorn veterans, not some ninnies with spit and polished armor, so I used the Badab wash liberally to achieve that end.
I took some shots of the tactical squad with some of the foamcore buildings I had made. Foamcore buildings look great, and are cheap to build, but they are time consuming. I will post a tutorial later.
Tactical Squad WIP 1
I guess the first images I will post are from a few months back, at the end of January 09 to be exact. I purchased my first tactical squad and with an AoBR set on the way, began to put them together and paint them. This was my first ever attempt at mini-painting. Also, I was dabbling in using a plaster / pva mixture to form a solid texture to apply to foam-core buildings and rubble piles. Turned out good, I think. Anyway, here are the first pictures of the first tactical squad before I learned of washes.
My first blog!
First off I will spend some time pulling my Blood Angel-successor chapter WIP posts from forums onto this site. It will help to show you how far I have come from my really bad days of just starting!
On the to-do list: I have a whole bunch more stuff to paint, so WIPs of those will be coming as soon as I finish them. I also promised some people on the forums that I would make how-to guides on my cork cityfight terrain, as well as the foamboard and plaster method for ruins. I have been wanting to take some army shots, so if I get more painted then that is a possibility for the near-future.
Stay tuned, because this blog is going to grow soon!
DISCLAIMER
Adeptus Astartes, Blood Angels, Bloodquest, Cadian, Catachan, the Chaos devices, Cityfight, the Chaos logo, Citadel, Citadel Device, Codex, Daemonhunters, Dark Angels, Dark Eldar, 'Eavy Metal, Eldar, Eldar symbol devices, Eye of Terror, Fire Warrior, Forge World, Games Workshop, Games Workshop logo, Genestealer, Golden Demon,
Adeptus Astartes, Blood Angels, Bloodquest, Cadian, Catachan, the Chaos devices, Cityfight, the Chaos logo, Citadel, Citadel Device, Codex, Daemonhunters, Dark Angels, Dark Eldar, 'Eavy Metal, Eldar, Eldar symbol devices, Eye of Terror, Fire Warrior, Forge World, Games Workshop, Games Workshop logo, Genestealer, Golden Demon, Gorkamorka, Great Unclean One, Inquisitor, the Inquisitor logo, the Inquisitor device, Inquisitor:Conspiracies, Keeper of Secrets, Khorne, Kroot, Lord of Change, Necron, Nurgle, Ork, Ork skull devices, Sisters of Battle, Slaanesh, Space Hulk, Space Marine, Space Marine chapters, Space Marine chapter logos, Tau, the Tau caste designations, Tyranid, Tyrannid, Tzeentch, Ultramarines, Warhammer, Warhammer 40k Device, White Dwarf, the White Dwarf logo, and all associated marks, names, races, race insignia, characters, vehicles, locations, units, illustrations and images from the Warhammer 40,000 universe are either ®, TM and/or © Copyright Games Workshop Ltd 2000-2016, variably registered in the UK and other countries around the world. Used without permission. No challenge to their status intended. All Rights Reserved to their respective owners.Games Workshop, the Games Workshop logo, Epic, Inquisitor, the Inquisitor logo, Inquisitor:Conspiracies, Battlefleet Gothic, the Battlefleet Gothic logo, Necromunda, the Necromunda Plate logo, the Necromuinda Stencil logo, Mordheim, the Mordheim logo, City of the Damned, Blood Bowl, the Blood Bowl logo, the Blood Bowl Spike device, Fanatic, the Fanatic logo, the Fanatic II logo, Warmaster and all associated marks, names, races, race insignia, characters, vehicles, locations, units, illustrations and images from the Blood Bowl game, Warhammer 40,000 universe and the Warhammer World are either ®, TM and/or © Copyright Games Workshop Ltd 2000-2016, variably registered in the UK and other countries around the world. Used without permission. No challenge to their status intended. All Rights Reserved to their respective owners.
Flames of war are either (R), TM and/or (C) Battlefront Miniatures.
Unless mentioned otherwise, the contents of this site are (C) Matt Darnell, 2008-2017